Battery switch on travel trailer function is crucial for managing your RV’s power. Understanding how to use it properly is key to preventing dead batteries and ensuring a smooth camping experience. This guide breaks down everything you need to know, from the different types of switches available to troubleshooting common problems. We’ll cover everything from basic operation to advanced power management techniques.
We’ll explore the various types of battery switches (single, dual, etc.), their wiring configurations, and the best practices for preventing battery drain. We’ll also delve into safety procedures, troubleshooting tips, and even how to install or replace your switch. Get ready to become a battery switch pro!
Understanding Battery Switch Functionality in Travel Trailers
Your travel trailer’s battery switch is a crucial component for managing your power sources. It allows you to disconnect your house batteries from the rest of the electrical system, preventing accidental drain and protecting your batteries from damage. Understanding how it works is essential for maintaining your RV’s electrical system and ensuring you have power when you need it.
Battery Switch Types
Travel trailers typically utilize different types of battery switches to manage their battery banks. The most common are single battery switches, which control a single battery, and dual battery switches, which manage two separate batteries. Some higher-end RVs might even incorporate more sophisticated systems with multiple switches or integrated battery management systems. A single battery switch is simple and sufficient for trailers with only one battery, while dual switches offer more control and flexibility, allowing you to isolate or combine batteries as needed.
For example, you might use one battery for house power and another for starting your vehicle.
Typical Wiring Configuration, Battery switch on travel trailer function
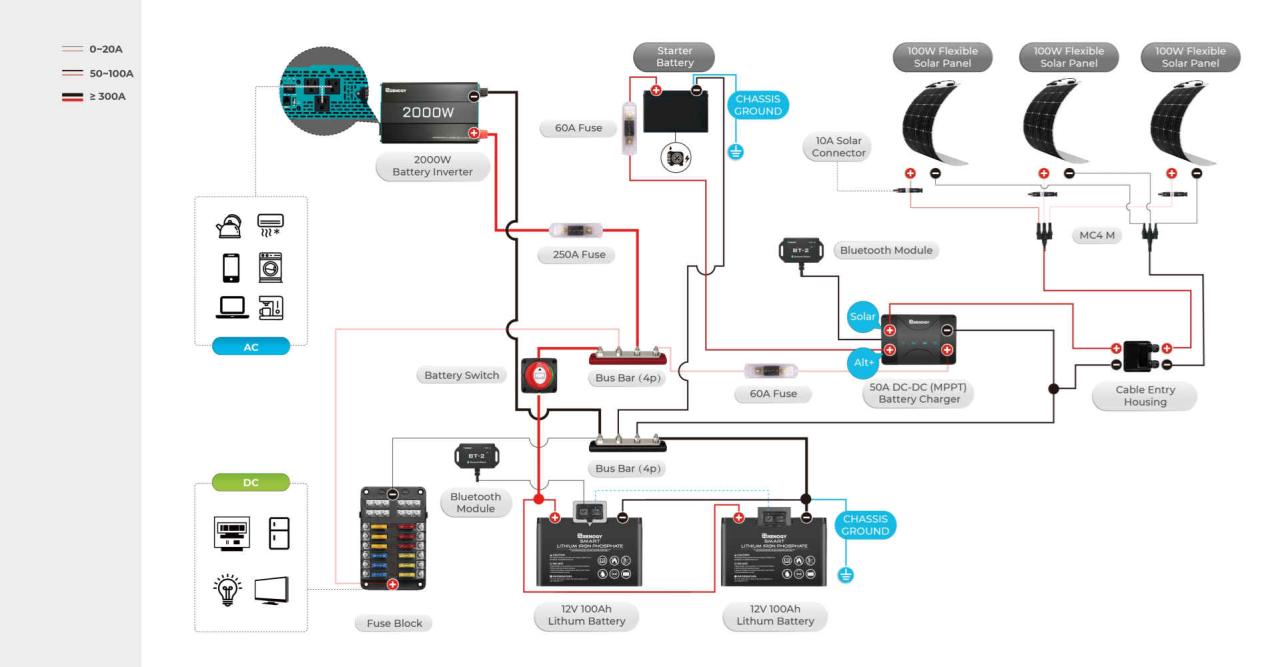
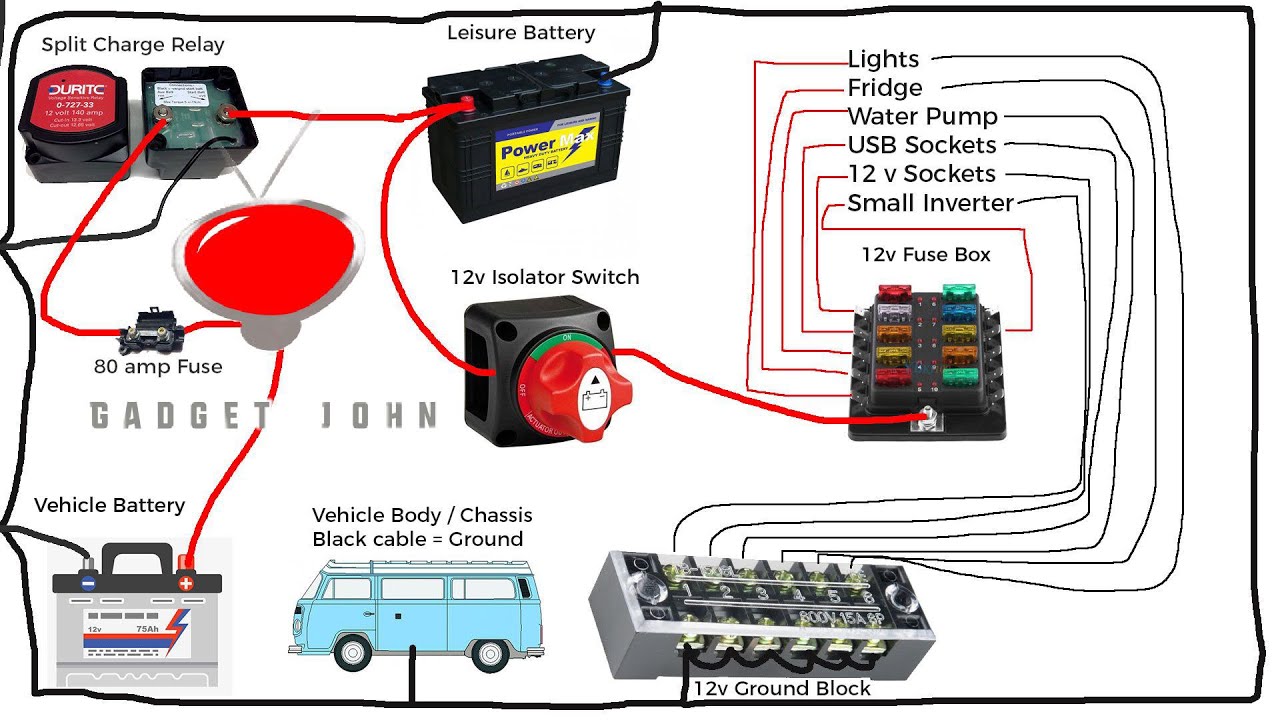
A typical battery switch system involves a few key components: the battery switch itself, your house batteries, and the wiring connecting them to the trailer’s electrical system. The switch acts as an on/off switch for the power flowing from the batteries to the rest of the trailer’s electrical components. Wiring typically includes heavy-gauge cables to handle the current draw from the batteries.
A common configuration involves the positive (+) cable from the battery connecting to the switch, and then a cable from the switch to the main power distribution panel of the trailer. The negative (-) cable usually connects directly to the chassis ground. Dual battery switches will have separate terminals for each battery and may offer options for connecting them in parallel or series.
Using a Battery Switch
Properly using your battery switch is vital for preventing battery drain and maintaining your RV’s electrical system. Here’s a step-by-step guide:
- Locate your battery switch: This is usually located near the batteries themselves or in a readily accessible location within a compartment.
- Identify the switch positions: Most switches have clearly marked positions, such as “ON,” “OFF,” and sometimes “Both” or “1,” “2,” and “Both” for dual battery systems. “OFF” completely disconnects the batteries. “ON” connects the batteries to the trailer’s electrical system. “Both” (if applicable) connects both batteries together.
- Turn the switch to the desired position: Before starting any work on the electrical system, always turn the switch to the “OFF” position to disconnect the batteries. When you want to use your trailer’s electrical system, switch it to “ON”. If you have a dual battery system, use the “Both” position to combine the batteries for maximum power or individual positions to isolate them.
- Regularly check the switch: Periodically check the battery switch to ensure it’s functioning correctly and that the connections are secure. Loose connections can lead to poor performance or even fire hazards.
Troubleshooting Common Battery Switch Issues
Dealing with a faulty battery switch in your travel trailer can be frustrating, but with a systematic approach, you can usually pinpoint and fix the problem. This section will guide you through common issues, troubleshooting steps, and necessary tools. Remember to always disconnect the battery’s negative terminal before working on any electrical components for safety.
Battery switch problems often manifest as unexpected power outages or the inability to switch between battery banks. These issues can stem from a variety of sources, ranging from simple blown fuses to more complex switch malfunctions. A methodical approach to troubleshooting is crucial for efficient repair.
So, you’re prepping for a road trip in your travel trailer? Awesome! First things first: make sure you understand the battery switch on travel trailer function – it’s crucial for managing your power. Knowing how to use it will save you headaches later. And while you’re planning, don’t forget travel insurance! Consider getting a policy from Aon travel insurance for peace of mind on the road.
Proper insurance coverage is just as important as knowing your trailer’s electrical system. Have a fantastic trip!
Common Battery Switch Problems
Common problems include a malfunctioning switch itself (due to wear, corrosion, or internal failure), blown fuses in the switch’s circuitry or within the trailer’s electrical system, loose or corroded connections at the battery terminals or the switch, and damaged wiring between the battery and the switch. Sometimes, the problem isn’t the switch at all, but rather a problem within the trailer’s electrical system, such as a faulty appliance drawing excessive current.
Troubleshooting Flowchart
A flowchart can greatly simplify the diagnostic process. Follow these steps to systematically identify the source of the problem:
1. Check Fuses: Inspect all fuses related to the battery switch and the trailer’s 12V system. Replace any blown fuses. If a fuse blows immediately after replacement, there’s a short circuit somewhere in the system.
2.
Inspect Connections: Examine all connections at the battery terminals and the battery switch itself. Look for corrosion, loose wires, or damaged terminals. Clean and tighten any loose connections.
3. Test the Switch: Use a multimeter to test the continuity of the switch in its various positions.
So, you’re gearing up for a road trip in your awesome travel trailer? First things first: understand your battery system! Check out this guide on the battery switch on travel trailer function to avoid any dead-battery surprises. Knowing how to manage your power is crucial, and once you’ve got that sorted, it’s time to think about insurance.
Before you hit the road, secure your trip with a reliable travel insurance policy, like Aon travel insurance , for peace of mind during your adventure. Happy travels!
If the switch fails to show continuity in the expected positions, it is likely faulty and needs replacement.
4. Check for Voltage: Use a multimeter to check for voltage at the battery terminals and at the output of the switch. A lack of voltage indicates a problem in the wiring or the switch itself.
5.
Inspect Wiring: Visually inspect all wiring connected to the battery switch for any damage, such as fraying or breaks. Repair or replace damaged wiring.
6. Load Test: If the problem persists, conduct a load test on the battery bank to ensure it’s delivering sufficient power. A weak or failing battery can mimic symptoms of a faulty switch.
Necessary Tools for Repair or Replacement
Having the right tools on hand makes the repair process much smoother. Here’s a list of essential tools:
- Multimeter
- Screwdrivers (Phillips and flathead)
- Wrench (size appropriate for battery terminals)
- Wire strippers/cutters
- Electrical tape
- Replacement fuses (matching the original amperage)
- Wire connectors
- Battery terminal cleaner
Possible Symptoms and Causes
This table summarizes common symptoms and their likely causes:
| Symptom | Possible Cause | Possible Cause | Possible Cause |
|---|---|---|---|
| No power to appliances | Blown fuse | Faulty battery switch | Loose/corroded connections |
| Power only to one battery bank | Incorrect switch position | Faulty switch | Problem in wiring to one bank |
| Intermittent power | Loose connections | Corroded connections | Faulty switch |
| Fuse blows repeatedly | Short circuit in wiring | Faulty appliance | Overloaded circuit |
Battery Switch and Different Power Sources
Your travel trailer’s battery switch acts as a central power manager, coordinating power flow from various sources like shore power (hookups at campsites), your generator, and your trailer batteries. Understanding how this switch interacts with these sources is crucial for efficient power management and preventing electrical issues.The battery switch’s primary role is to select and control which power source feeds your trailer’s electrical system.
It allows you to choose between running solely on your trailer batteries, using shore power, running on generator power, or even combining power sources in some cases (though this depends on your specific setup). This control prevents conflicts and protects your batteries from overcharging or discharging.
Power Flow with Different Sources
The battery switch acts as a gatekeeper for power. When the switch is in the “off” position, all power flow to the trailer’s electrical system is cut off. In the “battery” position, only power from your trailer batteries is used. With the switch in the “on” or “shore” position, shore power or generator power becomes the primary source, charging the batteries and powering your appliances.
Imagine a simple diagram: Three lines converge at a switch. One line represents the trailer batteries, another represents the shore power inlet, and the third represents the generator. The switch has three positions: OFF, BATTERY, and ON (or SHORE). The output line from the switch leads to the trailer’s electrical system. In the OFF position, the output line is disconnected from all sources. In the BATTERY position, only the battery line is connected to the output. In the ON position, the shore power or generator line is connected to the output, with the battery line optionally connected for charging.
Power Distribution Comparison
With the battery switch engaged (in either the “battery” or “shore/generator” position), power flows smoothly to the trailer’s systems. The switch ensures that the appropriate source is selected, preventing short circuits and allowing for efficient charging of the batteries.Without the battery switch engaged (in the “off” position), all power to the trailer’s electrical system is cut off. This is a safety feature to prevent accidental discharge or damage.
It also means that you cannot run any appliances unless you select a power source via the switch. The batteries are isolated from the system, preventing any accidental drain. Shore power or generator power is also unable to reach the trailer’s appliances.
Mastering your travel trailer’s battery switch is a game-changer for any RVer. By understanding its function, properly utilizing it, and performing routine maintenance, you’ll avoid frustrating breakdowns and ensure your power stays on when you need it most. Remember, safety first! Always disconnect your battery before working on the system. With a little knowledge and these tips, you can confidently manage your power and enjoy worry-free adventures.
Common Queries: Battery Switch On Travel Trailer Function
What happens if I leave my battery switch on?
Leaving your battery switch on constantly can drain your batteries, especially if you have devices drawing power even when not actively using the trailer. It’s best to turn it off when not using the trailer for extended periods.
How often should I check my battery switch?
Regularly inspect your battery switch for corrosion, loose connections, and any signs of damage. A visual check every few months, or before each trip, is recommended.
Can I use a battery switch with lithium batteries?
Some battery switches are compatible with lithium batteries, but others are not. Always check the manufacturer’s specifications to ensure compatibility before installation.
My battery switch is making clicking noises. What’s wrong?
Clicking noises usually indicate a problem with the switch itself, a low battery, or a loose connection. Check your battery voltage and connections before replacing the switch.
